
Here are the programming instructions for a 2000 Suzuki Grand Vitara Key Fob Remote. If you need an extra Key Fob or Replacement Fob for any vehicle you might have visit us at Keylessentryremotefob.com You can also leave comments or suggestions at the bottom of this blog. If you like what we provide please forward on to your friends & family and share via the social media icons below; people like you are our best advertising tool!
ORDER THIS KEY FOB PART NUMBER HERE: XT-54A
Keyless Remote Programming for the 2000 Suzuki Grand Vitara
This information is provided free for use AT YOUR OWN RISK and is without guaranty
or warranty or of any kind. Your use of this information signifies that you assume all
responsibility for any damage or loss.
(Fig. 1) Keyless Remote or “Key FOB†Original and New. XT-54A, FCC ID: B23AT54
First verify that your Keyless Remote System Unit looks like the unit in the pictures
below. If not your unit may not be the model year listed above or your unit may have
been replaced and this programming procedure will NOT work.
Tools Needed: #2 Phillips Head Screwdriver
Plastic Pen Cap with Pocket Clip (See Fig. 4)
Flash Light
The Keyless Remote System Unit is located under the dash directly under the steering
column. You can see the unit simply by looking UP under the dash.
You will find it is much easier to see and program the unit if you remove the “dash skirtâ€
which is made of plastic and held in place at the bottom by 3 Phillips head screws. It is
held at the top by “snap clipsâ€. After removing the 3 screws gently pull the “dash skirtâ€
straight out from it’s mount. Twisting or prying can snap the plastic.

down under the dash and is still plugged into the wire harness. Removing the unit from
its mount is NOT required for programming.
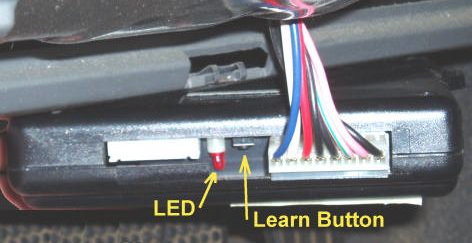
(Fig. 3) The “Learn Button†and “LED Light†are located inside the unit and can be seen
through a square hole next to the wire harness connector. The “Learn Button†is
mounted sideways inside the square hole.
With a Flash Light find the “Learn Button†and “LED Light†on the LEFT SIDE of the unit
next to the white connector. Have all the Key Remotes (FOB s) you wish to program
within reach.
Note: Pressing the “Learn Button†will ERASE the memory of the System Unit and
ready it for programming. All previous programming will be LOST!
Programming:
1. Remove key from Ignition.
2. Using a Plastic Pen Cap, Press and Hold the “Learn Button†until the “LED Lightâ€
begins to blink. (The Unit is in LEARN Mode). Note: The unit will “Timeout†in 5
Seconds (LED Off).
3. Within 5 seconds, Press and hold the “LOCK†Button on your Remote until the
“LED Light†stays light (without blinking).
4. Within 5 seconds, Press and hold the “UNLOCK†Button on the same Remote
until the “LED Light†stays light (without blinking).
5. Repeat Steps 3 and 4 on the each Remote until all Remotes have been
programmed (up to 4 Remotes).
6. Wait 5 seconds for unit to “Timeout†(LED Off).
7. Test each remote by pressing the “LOCK†and “UNLOCK†Buttons.
If the “LED Light†should “Timeout†(LED Off) during this procedure, Start Over, go to
Step 2.
Having trouble programming the remote or just want a professional to program the remote for you? Enter your city or zip code in the search box below to find a professional key fob installer in your area.
ENTER YOUR CITY NAME TO FIND A
PROFESSIONAL KEY FOB INSTALLER NEAR YOU
